Proper table structure is important to accessibility. Among other issues, poorly constructed tables cannot be properly read by screen readers for the visually impaired.
Appropriate Content
Tables should only be used for tabular data. NEVER use a table for layout. Try to simplify or split up tables that are complicated or large. Avoid incorporating any non-tabular data in a table. If the table has a title, you should add that title as a Table Caption.
To give your table a title:
- Select your table, then click Inserts a new table () to modify that table's properties.
- Once the table has been made, select the table in the WYSYWIG, then press the (
 ) tab again select "Table caption/summary" and fill out the necessary items.
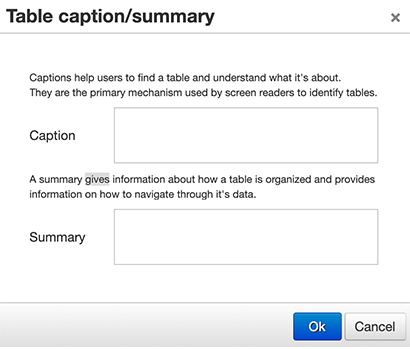
- A new row has been added to the top of your table. Type the title of your table in that new row.
Formatting
If your content contains a table make sure your table in the WYSYWIG is highlighted and then press the table tab, you have the option of editing the Table row properties () by pressing
"Row" then "Row Properties" or Table cell properties () by pressing
"Cell" then "Cell Properties". Please note that the background color, border, width, height, etc., of the table will be determined automatically by our templates if those properties are left blank. Unless the content in your table specifically requires formatting that is different from our default formatting, please leave those properties blank.
Headers
Entire rows and individual cells can both be marked up to be headers. Every table should include headers. By marking up your headers properly, you ensure that they are formatted correclty and fully accessible.
Marking up only a row as a header is not enough. All individual header cells must be marked up as such, whether or not they are also in a row that is marked up as a header.
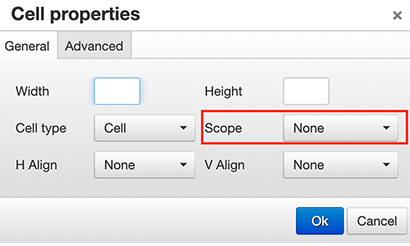
For data tables that have two or more levels of row or column headers, add scope attributes to your header cells to clarify which parts of the table those headers correspond to.
To mark up header cells:
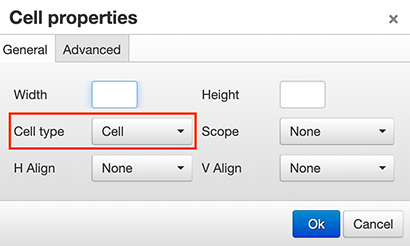
- Have your table selected in the WYSYWIG and then hit () then scroll down and click "Cell" then "Cell Properties".
- For Cell type, select Cell Header.
To add scope attributes to header cells:
- Select the cell in the WYSYWIG, then click the Table dropdown () then select "Cell" then "Cell Properties".
- For Scope, select Column or Row.
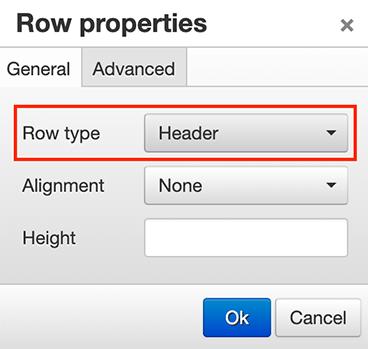
To mark up header rows:
- Select the row in the WYSYWIG, then click Table row properties () then select "Row" then "Row Properties".
- For Row type, select Header.