


Here are a few techniques and guidelines for using the WYSIWYG editor in T4. The complete guide is available in the T4 Training Documentation.
Pasting Formatted Content
When you copy content from an outside source, such as Word or another website, you often copy the content's formatting as well. This formatting is often invisible to you; though, it may interfere with the way your content displays on published T4 pages.
Want to avoid this? You have several options:
- Use the Paste plain text button (
 ) when pasting text from an outside source. This option will remove all hidden formatting. Just click the button, then paste your content.
 - If you are copying content from Microsoft Word into T4, try using the Paste plain Word button (
 ). This option will convert Word formatting into HTML code that is compatible with the T4 system. Just click the button, then paste your content.
 - To remove all formatting from content you have already copied into the editor, click the Remove all formatting button (
 ).
).
Floating Images
 After you have added an image to your content, you have the option of floating it to the left or right.
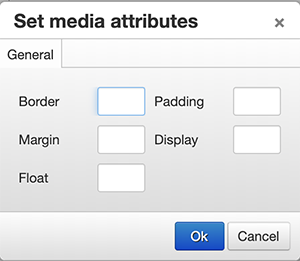
Access the image's Media Attributes by double-clicking the image. To float the image to the left or right, type "left" or "right" into the Float field. Please do not type anything into the Border, Padding, Margin, or Display fields. If left blank, these attributes will be determined automatically by our templates.
Creating Links
There are five types of links available in T4: web links, section links, content links, anchor links, and the media library.
To select what you will link, you must be in a content type and highlight the text you want linked. You have five options for linking; though some are similar, they will have different results. Below, you will find descriptions and information on when to use each.
Insert/Edit External Web Links
External links allow you to link to any URL on the web.
Inserting an external link works a bit differently than a section or a content link. You will have to highlight the words you want to link, click on the chain icon ( ) , and then choose Insert/Edit External Link. A separate screen will pop up asking you the URL, text to display, title, and target. The URL is self-explanatory: Add the URL including the full “https://www.” if necessary. The text to display is where you will input the text you want to display for the user to click on.
The title attribute is not necessary, but it can be helpful if you are linking an image, which should already have alternate text from when you uploaded it to the media library. The target attribute will give you two options: “None” will keep users on the same page or “new window” will open the page in a new tab (this is recommended).
Section links allow you to link to other sections in TerminalFour (T4). If that other section’s URL is changed in the future, any section links that point to that page will be automatically updated as well.
When you select a section link, make sure you have a piece of text highlighted. Then select the chain icon () at the top of the body text block and select Insert Section Link ( ). A pop-up window will appear, and it will give you the option to link to a specific section in T4. Click on the section of the website you would like to link to, and the pop-up window will go away. Alternately, if you don’t have any text highlighted before you click Insert Section Link, the title of the section will be automatically output as the link text.
A limitation of section links is that you can only create section links to sections that you have access to in T4. For pages that you do not have access to, paste the page’s URL into an external link (see instructions below).
Content links allow you to link to an individual piece of content in T4.
A content link ( ) works similarly to a section link; however, when you click on the section, it will then prompt you to pick a specific content type within that section. Once it is linked, when a user clicks on that link, it will take them to the specific part of the section you applied it to.
Anchor links allow you to place an anchor anywhere on the page, then link to it from elsewhere. When a user clicks your link, the page will automatically scroll to wherever you placed the anchor.
Anchor links can be helpful when you want to bring a website visitor to a specific spot on a page. Inserting an anchor link consists of two parts: where you want it to link to, and having a link on the page. An example would be on the Officer Spotlight page.
When you want to insert a link order for a user to go to that specific section of the page, you will need to click the chain icon () and choose Insert Anchor ( ). A window will pop up to add the name; you can name it anything you’d like as long as it is specific but not too long. All anchors on a page must have a different name; no two can be the same. Anchor names cannot include spaces and most special characters.
To have a link go to that anchor, you will need to click on Insert/Edit External Link, and in that URL text you will need to have what you named the anchor link accompanied with a hashtag. For example, if you inserted the anchor link and chose PlannedGiving, you will have to insert #PlannedGiving in the Insert/Edit External Link. It is caps sensitive, so please make sure to check your spelling.
If the anchor and anchor link are both in the same text box, T4’s editor will add a helpful “Anchors” drop-down to the Insert/Edit External Link panel. If this drop-down does not appear, though, you can still link to the anchor by manually typing in a hashtag followed by the anchor name, as previously explained.
Media library links are created to link to items you have uploaded to T4’s media library, such as PDFs or images. Please make sure uploaded media meet all accessibility requirements, including appropriate alternate text for all image descriptions.
Media library links are pertinent for when you are linking an image file, document, or PDF. When you input a document or PDF, it will mimic the name that you inputted when you uploaded the file. As for the image, that name will appear if the image eventually breaks, but that only happens if you move it to a different file location without updating its location, as well as what an accessibility reader will pick up.
When you input a media file and are in the content type, you will see an icon that resembles an image ( ). When you hover over it, it will say Insert From Media. Once you click the button, it will take you to where you originally uploaded the media file. In addition, if you didn’t upload the file, you have the option to upload it when you are choosing your file.
Removing a Link
To remove a link of any type, highlight the link and click the Unlink ( ) button.