

If the request is urgent such as an active leak, please call 410-706-7570 immediately. For non-urgent issues, please submit a request through the Facilities Work Request Portal (FWRP).

Watch this short video for an overview on how to log in and submit a request through FWRP.

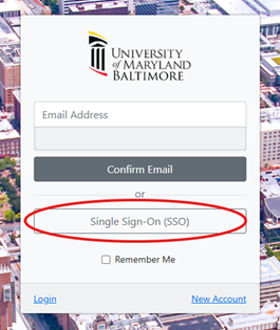
1. UMB affiliated team members: Select Single Sign-On (SSO) and enter your UMID and password.
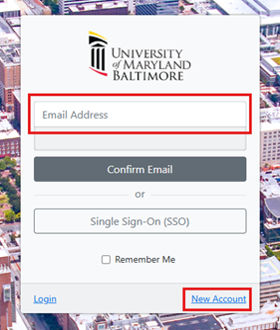
2. UMB guests: Select New Account to create a local profile the first time you log in. For future visits, simply enter your email address and follow the prompts to log in.

Note: Guests cannot submit billable work requests unless they have a valid UMB SOAPF or project number. While estimates are free, a valid account number is required before an estimate can be prepared. Please see our Services and Rates information page and contact the Facilities Service Center at 410-706-7570 or fmsc@umaryland.edu if you have additional questions.

  • Select Settings > User Profile

  • Scroll down to Email and/or Phone and select Add.
  • Follow and enter the prompts for each and select Done.


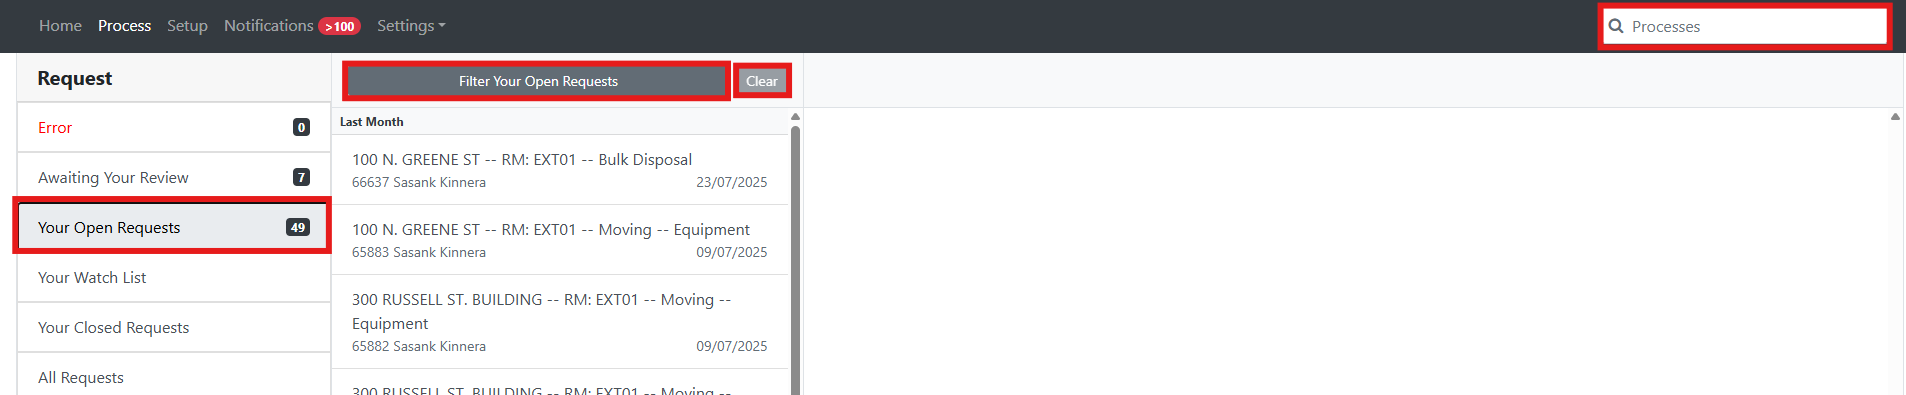
  • Select Process" from the navigation bar in the upper left-hand corner.
  • Select Open Requests" from the left menu which allows you to view all current requests you submitted using your UMID & password.

Note: If someone in your division has access to view the request, you may ask them to @your name in the Comments"  section of the request to view it or you can contact the Facilities Service Center at FMSC@umaryland.edu or via 410-706-7570 for details.

  • To view a request, select it from the menu on the right or use the Filter Your Open Requests" option to narrow down the type of request you want to see. If you want to remove filters and view all open requests again, click the Clear" button. If you already know the request number, you can enter it in the Processes"  box at the top right (next to the magnifying glass icon) to go directly to that request.

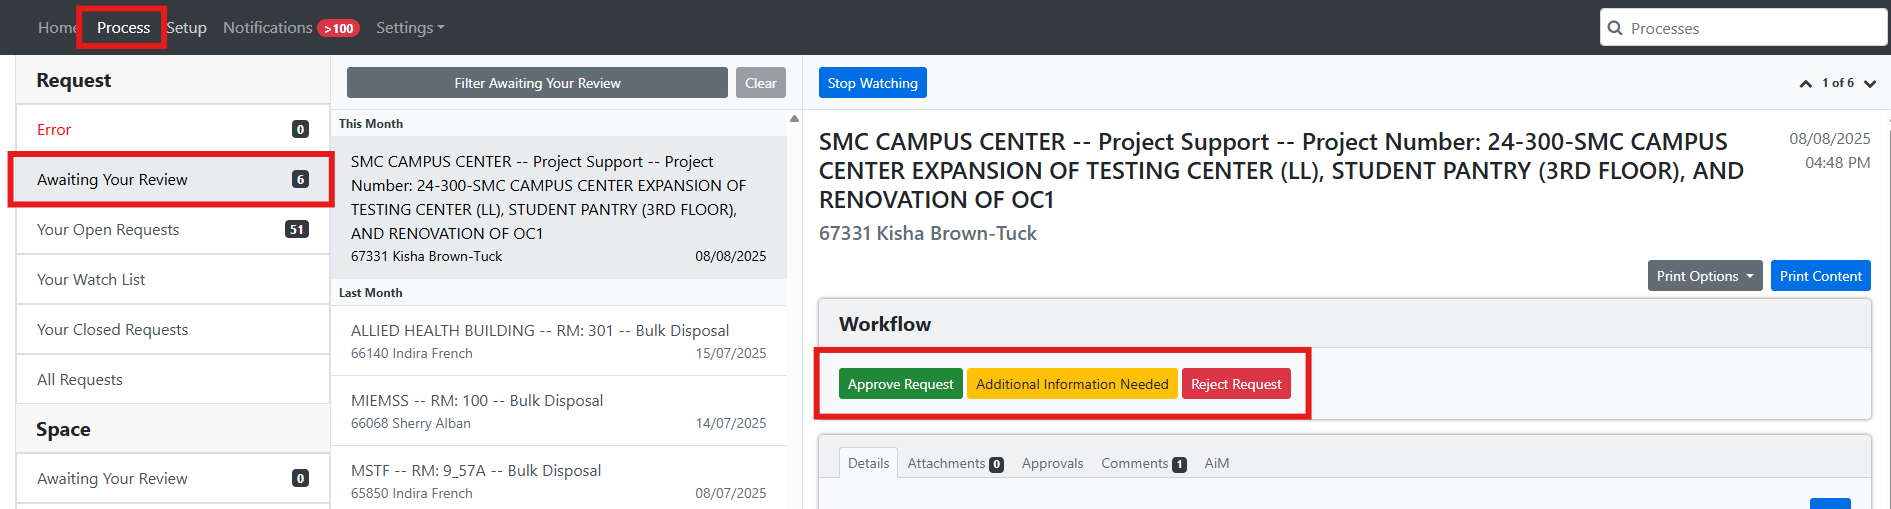
  1. Select Process" from the navigation bar in the upper left-hand corner.
  2. Select Awaiting Your Review" from the left menu. This area allows you to view all pending requests with estimates available for your approval and/or requests where you are an approver in the workflow (ex. Building managers).
  3. Select the request you wish to review and review the details of the request by selecting the sub-menu tabs labeled as: Details, Attachments, Approvals, Comments, and AiM (this is where you’ll find your work order number and status information once the request has passed the workflow of approvals to be generated into our shop’s queues).
  4. Select the appropriate response after reviewing the request:
  • Building Managers and Facilities Staff will see workflow selections such as Approve Request,” “Additional Information Needed,” or Reject Request.”

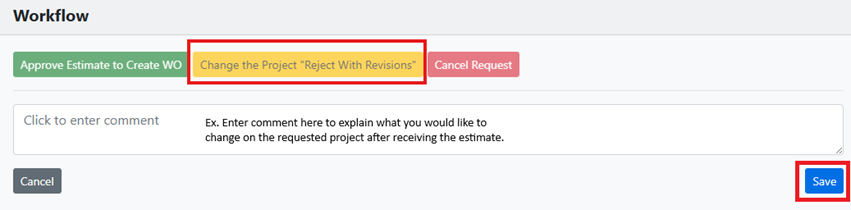
  • Customers submitting billable requests who need to approve, reject, or modify an estimate they have not yet approved will see selections such as Approve Estimate to Create WO,” “Change the Project Reject with Revisions,” or Cancel Request.” Based on the selection you make, you may be asked to provide additional information. Simply follow the prompts and select Save after entering comments.

1. AiM tracks requests through work orders and phases:

  • A work order is your original request.
  • That request may require multiple trades (e.g., HVAC, Plumbing, Electrical, Lock) or multiple technicians.
  • To manage this, AiM creates phases within the work order—each phase corresponds to a specific trade or technician responsible for part of the work.

2. AiM status update notifications explained:

  • OPEN
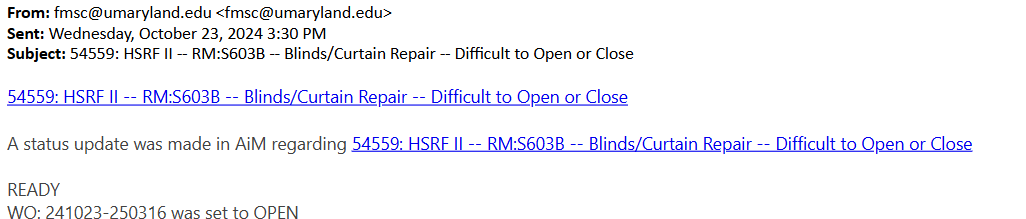
    Once your request is fully approved, you will receive an email confirming that the work order has been opened with clickable links that will navigate you back to the request. This status means your request has officially entered the appropriate trade shop’s work queue for review. From there, shop supervisors or leads will determine how to staff the work — assigning it to the appropriate technician(s) and creating phase(s) as needed.

    In addition to the email notification, you will be able to view this status (and all others) with a date/time stamp on your request within the AiM tab on our portal. See samples below.
     
    • Email Notification:
       
    • AiM Request Tab Status History:

Note: The first six digits of the work order number indicate the year, month, and day).

  • ASSIGNED

When a technician is assigned to a phase of your request, you will receive a notification via email and see the following in the status history of the request:

  • ANOTHER SHOP ADDED

If the work involves multiple trades working separately, additional phases will be added. You will receive a notification via email and see the following in the status history of the request:

  • REQUEST COMPLETE

Once all work is finished and all phases have remain closed (or canceled where appropriate) for one day, you will receive a notification via email and see the following in the status history of the request:

3. Quantity of Notifications and Preferences:

  • If your request has multiple phases, you will receive a notification for each one as it changes status. The phase numbers are listed with a three-digit numbering convention (ex. 001, 002, 003, etc.).

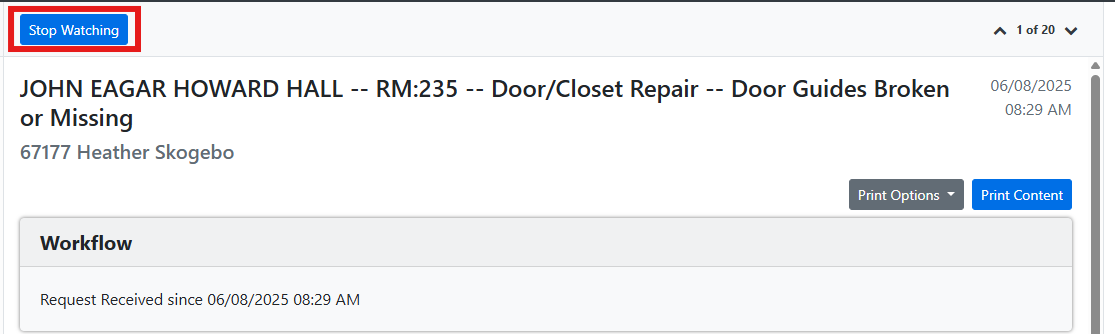
  • You can stop notifications for a specific request by selecting “Stop Watching” at the top left of a particular request. Once selected, a new button will appear that says “Start Watching” that can be selected to again receive notifications.

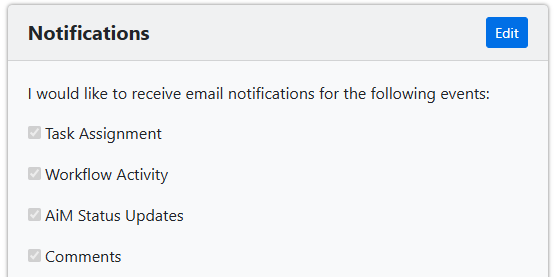
  • If you prefer to view status updates directly in the portal rather than being notified via email, you may opt out of emails tied to AiM Status Updates in your Settings>Notifications. For more details regarding the other notification types, see FAQ No. 6.

You can manage your email notification settings by navigating to:

Facilities Work Request Portal → Settings → User Profile → Notifications

The system has four notification types that are designed to keep you informed about your requests and tasks. Preferences may vary depending on your role and how you interact with the system. For example, building managers and Operations and Maintenance (O&M) staff who use the portal frequently may prefer to rely on the “All/Your Open Requests” view under the "Process" screen instead of receiving frequent emails.

All requests you have submitted are viewable in the "All/Your Open Requests" section of the "Process" screen.

All requests you are watching are viewable in the "Your Watch List" section of the "Process" screen. 

Below is a breakdown of each notification type, including user recommendations. 

1. Task Assignment

Purpose:

Receive an email when you are assigned a new task in the workflow. This ensures that critical action items such as estimate approvals aren’t missed.

Functionality:

When a task is assigned to you, you are automatically added as a Watcher of the request. You’ll continue to receive updates related to that request if the "Task Assignment" box is checked in your user profile. To learn how to start watching or unwatch a request, see FAQ No. 5.

Who should enable this:

  • All University  customers — required (needed for approving estimates)
  • Building managers — required
  • O&M staff — required

2. Workflow Activity:

Purpose:

Notifies you when someone takes action in the workflow. For example, when an estimate is sent or approved, the members in the respective workflow will get notified.

Functionality:

Notifications are sent to all watchers of a request anytime a step in the workflow is completed if the "Workflow Activity" box is checked in your user profile. This helps everyone stay informed without needing to check the system manually.

Who should enable this:

  • All University customers — optional
  • Building managers — recommended
  • O&M staff — recommended

3. AiM Status Updates

Purpose:

Keep you informed when the status of a Work Order or Phase changes.

Examples include:

  • Work order statuses: Open & Request Complete
  • Phase statuses: ASSIGNED & ANOTHER SHOP ADDED
  • For more details about our statuses, see FAQ No. 5.

Functionality:

Notifications are triggered by status changes and sent to all Watchers who have the "AiM Status Updates" option selected in their user profile. These updates also appear in the Notifications tab at the top of the work request portal and are sent to the users primary email.

Who should enable this:

  • All University Customers — required (unless you prefer to check the portal manually)
  • Building managers — recommended (based on volume and preference) 
  • O&M staff — optional 

4. Comments

Purpose:

Receive alerts when someone comments on a request or mentions you using @name for direct communication and collaboration.

Functionality:

If you are  watching a request or are added using the @name mention feature, you’ll receive email notifications for all new comments on that request. This ensures that you’re kept in the loop and helps maintain a clear, time-stamped record of the conversation within the request.

Who should enable this:

  • All University Customers — required
  • Building managers and maintenance staff — required
  • O&M staff – required

O&M’s Commitment to Customers:

Emergencies and Urgent Issues (as defined by facilities)
  • Contact within the same day
  • Addressed immediately or with 24 hours
Routine Maintenance and Repairs
  • Contact within two business days of submission
  • Completed on average within seven business days, but may take longer depending on request complexity, volume, and staff availability
Estimates for Billable Work
  • Contact within five business days of receipt by O&M, after building manager approval
  • Estimates provided for free within five business days after scope review and approval with customer
  • Complex projects or use of outside contractors may increase estimating time frame
Billable Requests
  • Contact within five business days of estimate approval to discuss scheduling
  • Scheduled on average within two to four weeks, depending on project scope and resources. Smaller projects may be completed sooner; longer projects may require additional time


Create an inbox rule in Outlook to automatically sort and handle incoming emails for you. You can set conditions such as sender, subject, or keywords, and Outlook will automatically move, flag, forward, or categorize those emails so your inbox stays organized. Instructions are listed for both the old and new desktop version of Outlook as well as the web-based version.

Outlook (Desktop App) OLD Version

1. Open Outlook 
   - Launch the Outlook desktop application.
2. Go to Rules
   - Click on “File” in the top-left corner.  
   - Select Manage Rules & Alerts.”
3. Create a New Rule 
   - In the Rules and Alerts window, click “New Rule …”
4. Start from a Template or Blank Rule  
   - Choose “Move messages from someone to a folder” under Stay Organized, or  
   - Select “Apply rule on messages I receive” under Start from a blank rule.
5. Set Conditions
   - Choose conditions such as:
   - From a specific sender
   - With specific words in the subject or body (e.g., “O&M”)
   - Click Next.
6. Choose an Action  
   - Select “move it to the specified folder.”
   - Click on “specified” to choose or create the folder (e.g., “O&M Bucket”).
7. Name the Rule and Finish
   - Give your rule a name (e.g., “O&M Email Rule”).
   - Check “Turn on this rule”.
   - Click Finish, then Apply.

For Outlook Web or Outlook (Desktop App) NEW Version

1. Go to Outlook Web.
2. Click the gear icon (⚙️) → View all Outlook settings.
3. Navigate to Mail → Rules.
4. Click Add new rule.
5. Set the rule name, conditions (e.g., subject contains “O&M”), and actions (e.g., move to folder).
6. Save the rule.

Click here for additional information  about setting up inbox rules and reach out to the helpdesk (ASC-Help@umaryland.edu) if further assistance is needed.